
Custom Entity Icons in Dynamics 365 v9 Made Easy


Upgrading to version 9 of Dynamics 365? Worried about the new look and feel? Having trouble adding those beautiful icons for your custom entities? This blog is for you, and trust me, you’ll thank me in the end.
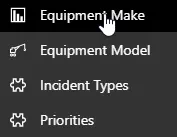
The new Unified Client Interface (UCI) presents some new challenges updating custom icons (whether entity or ribbon buttons). You will first notice that they default to a puzzle piece (no additional commentary needed).
This is because version 9 uses a new vector image format (SVG) in the latest release. The legacy client interface still utilizes the old image formats while the UCI uses on the new SVG format. If you attempt to load the old PNG files (32 or 16) into the UCI, it will be pretty evident when you open that entity in the UCI that the image isn’t rendering properly, so you will need to provide icons in both image formats if you plan on using the Unified Client Interface.
After much exhaustive scientific research… ok, trial and error… I have figured out a process that will help you easily update those icons and deliver the excellence our clients expect……AKA cool looking icons, instead of those pesky jigsaw puzzle pieces, inside of lookup fields and on your side navigation in the Unified Client Interface.
Hopefully, this also saves you quite a bit of headache, heartache, heartburn, and heartbreak as well.
I recommend using the SyncFusion Metro Studio App to create and edit your custom icons. This application is not only free, but is the easiest path to creating the SVG files that are required in the new UCI, and I have taken the guess work out for you here. There are also thousands of great icons available for your use.
***Breaking News: Flaticons will not work for SVG files***
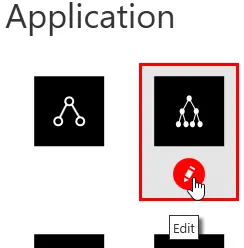
Once you have downloaded Metro Studio, locate an icon that you want to use in D365 and click on the edit button.
This will pop up the editing window where you can do your magic. You can create all three icons right from this window for the selected icon. Check it out:
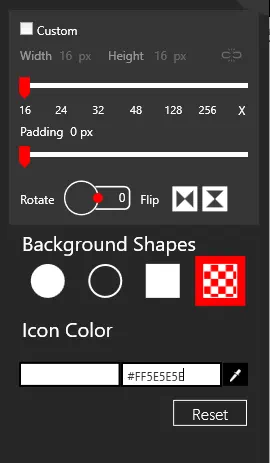
Create the 16 x 16 PNG file:
- Set the Height and Width to 16px.
- Set the Padding to 0px.
- Select the transparent background (Checkerboard Box)
- Select the standard gray Icon Color #FF5E5E5E
- Export as a .PNG file with a naming convention that will be easily recognizable when uploading the icons to the solution. (Example: Entity Name Icon 16)
16 x 16 PNG
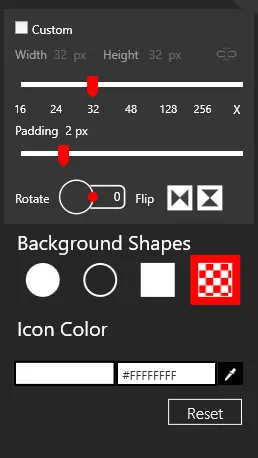
Create the 32 x 32 PNG file.
- Set the Height and Width to 32px.
- Set the Padding to 2px. (This replicates the padding used by Microsoft)
- Select the transparent background (Checkerboard Box)
- Select white as the Icon Color #FFFFFFF
- Export as a .PNG file with a naming convention that will be easily recognizable when uploading the icons to the solution. (Example: Entity Name Icon 32)
32 x 32 PNG
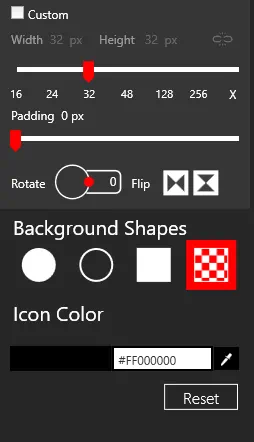
Create the UCI SVG file.
- Set the Height and Width to 32px.
- Set the Padding to 0px.
- Select the transparent background (Checkerboard Box)
- Select black as the Icon Color #FF00000
- Export as an SVG file with a naming convention that will be easily recognizable when uploading the icons to the solution. (Example: Entity Name Icon UCI)
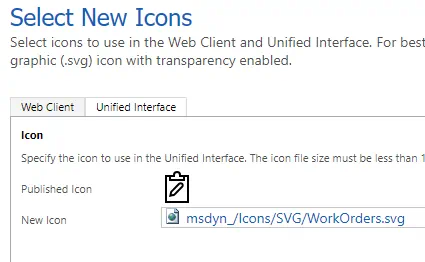
Now that you have your icons created and saved, upload them as web resources as you normally would in the past. Hint: The Iconator Tool in the XRM Toolbox is AWESOME for uploading / editing multiple images as web resources to a solution all at one time. Once you get the web resources created, head over to your solution, select the entity, and select “Update Icons” at the top. You will be able to upload entity icons like normal, but there will now be a second tab called “Unified Interface” where you can select your new SVG icon.
Enjoy!
Have any questions for Hitachi Solutions’ experts? Start a conversation today.